⚙️Spring Boot 启动流程源码解析
文章目录
- ⚙️Spring Boot 启动流程源码解析
- 🎯 一、Spring Boot 启动流程概览
-
- 🔄 启动流程全景图
- ⏱️ 启动阶段时间线
- 🏗️ 二、SpringApplication 初始化阶段
-
- 🚀 SpringApplication.run() 入口分析
- 🔧 应用类型推断机制
- 📦 工厂加载机制
- ⚙️ 三、启动前准备:Banner、Environment、Listener
-
- 🚀 run() 方法执行流程
- 🎨 Banner 打印机制
- 🌍 Environment 准备过程
- 🔄 四、创建 ApplicationContext 与加载 BeanDefinition
-
- 🏗️ 应用上下文创建机制
- 📋 上下文准备阶段
- 🔧 上下文初始器应用
- ⚡ 五、refresh 阶段与自动装配结合点
-
- 🔄 refreshContext() 核心流程
- 🎯 Spring Boot 特有的刷新扩展
- 🔧 自动装配与刷新的集成点
- 📢 六、应用启动事件与回调机制
-
- 🎯 Spring Boot 启动事件体系
- 👂 事件监听器机制
- 🔄 运行监听器获取机制
- 💻 七、自定义监听器与启动钩子实践
-
- 🛠️ 自定义启动监听器
- 🔧 启动性能监控工具
- 🎯 自定义应用运行器
- 🔧 启动故障诊断工具
- 💎 八、总结:从 main() 到容器就绪的生命线
-
- 🎯 Spring Boot 启动流程核心总结
- 🔄 启动流程完整时序图
- 🚀 性能优化建议
- 🔧 调试与监控最佳实践
🎯 一、Spring Boot 启动流程概览
🔄 启动流程全景图
Spring Boot 应用启动时序图:
main() SpringApplication ApplicationContext BeanFactory EventListener run() 初始化SpringApplication 加载应用上下文初始器 加载应用事件监听器 阶段1: 启动前准备 打印Banner 准备Environment 发布ApplicationStartingEvent 阶段2: 创建应用上下文 创建ApplicationContext实例 准备应用上下文 发布ApplicationContextInitializedEvent 阶段3: 刷新上下文 refresh() 加载Bean定义 实例化单例Bean 发布ContextRefreshedEvent 阶段4: 启动完成 发布ApplicationReadyEvent 返回ApplicationContext main() SpringApplication ApplicationContext BeanFactory EventListener
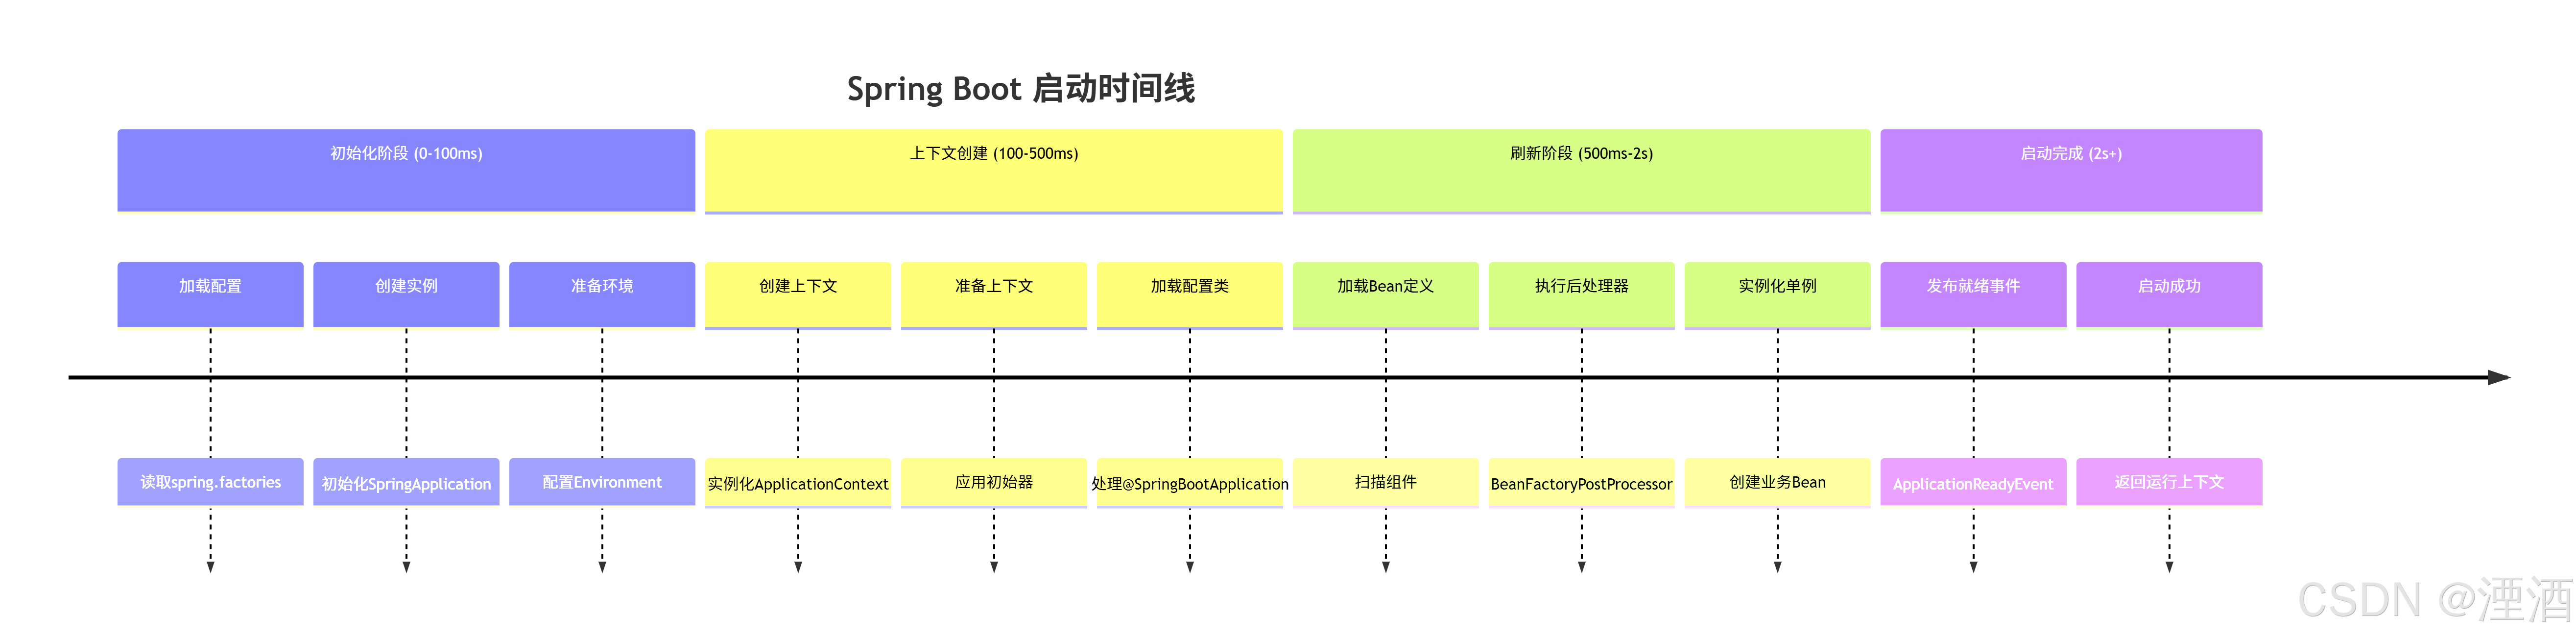
⏱️ 启动阶段时间线
关键启动节点时间分布:
🏗️ 二、SpringApplication 初始化阶段
🚀 SpringApplication.run() 入口分析
启动方法核心逻辑:
1public static ConfigurableApplicationContext run(Class<?> primarySource, String... args) {
2    return run(new Class<?>[]{primarySource}, args);
3}
4
5public static ConfigurableApplicationContext run(Class<?>[] primarySources, String[] args) {
6    // 创建SpringApplication实例并执行run方法
7    return new SpringApplication(primarySources).run(args);
8}
9
SpringApplication 构造函数源码:
1public SpringApplication(ResourceLoader resourceLoader, Class<?>... primarySources) {
2    this.resourceLoader = resourceLoader;
3
4    // 1. 设置主配置类(不能为null)
5    Assert.notNull(primarySources, "PrimarySources must not be null");
6    this.primarySources = new LinkedHashSet<>(Arrays.asList(primarySources));
7
8    // 2. 推断应用类型(Servlet、Reactive、None)
9    this.webApplicationType = WebApplicationType.deduceFromClasspath();
10
11    // 3. 加载应用上下文初始器(从spring.factories)
12    setInitializers((Collection) getSpringFactoriesInstances(ApplicationContextInitializer.class));
13
14    // 4. 加载应用事件监听器(从spring.factories)
15    setListeners((Collection) getSpringFactoriesInstances(ApplicationListener.class));
16
17    // 5. 推断主应用类(从堆栈跟踪)
18    this.mainApplicationClass = deduceMainApplicationClass();
19}
20
🔧 应用类型推断机制
WebApplicationType.deduceFromClasspath() 源码:
1static WebApplicationType deduceFromClasspath() {
2    // 检查类路径是否存在特定的类来判断应用类型
3
4    if (ClassUtils.isPresent(WEBFLUX_INDICATOR_CLASS, null)
5        && !ClassUtils.isPresent(WEBMVC_INDICATOR_CLASS, null)
6        && !ClassUtils.isPresent(JERSEY_INDICATOR_CLASS, null)) {
7        return WebApplicationType.REACTIVE;  // WebFlux应用
8    }
9
10    for (String className : SERVLET_INDICATOR_CLASSES) {
11        if (!ClassUtils.isPresent(className, null)) {
12            return WebApplicationType.NONE;  // 非Web应用
13        }
14    }
15
16    return WebApplicationType.SERVLET;  // Servlet Web应用
17}
18
应用类型推断的类路径检查:
1// 关键类路径检查常量
2private static final String WEBMVC_INDICATOR_CLASS = "org.springframework.web.servlet.DispatcherServlet";
3private static final String WEBFLUX_INDICATOR_CLASS = "org.springframework.web.reactive.DispatcherHandler";
4private static final String JERSEY_INDICATOR_CLASS = "org.glassfish.jersey.servlet.ServletContainer";
5private static final String[] SERVLET_INDICATOR_CLASSES = {
6    "javax.servlet.Servlet",
7    "org.springframework.web.context.ConfigurableWebApplicationContext"
8};
9
📦 工厂加载机制
getSpringFactoriesInstances() 方法实现:
1private <T> Collection<T> getSpringFactoriesInstances(Class<T> type) {
2    return getSpringFactoriesInstances(type, new Class<?>[]{});
3}
4
5private <T> Collection<T> getSpringFactoriesInstances(Class<T> type, Class<?>[] parameterTypes, Object... args) {
6    ClassLoader classLoader = getClassLoader();
7
8    // 1. 使用SpringFactoriesLoader加载实现类名称
9    Set<String> names = new LinkedHashSet<>(SpringFactoriesLoader.loadFactoryNames(type, classLoader));
10
11    // 2. 创建实例
12    List<T> instances = createSpringFactoriesInstances(type, parameterTypes, classLoader, args, names);
13
14    // 3. 排序(支持@Order注解)
15    AnnotationAwareOrderComparator.sort(instances);
16    return instances;
17}
18
⚙️ 三、启动前准备:Banner、Environment、Listener
🚀 run() 方法执行流程
SpringApplication.run() 完整实现:
1public ConfigurableApplicationContext run(String... args) {
2    // 1. 创建启动计时器
3    StopWatch stopWatch = new StopWatch();
4    stopWatch.start();
5
6    // 2. 初始化上下文和异常报告器
7    ConfigurableApplicationContext context = null;
8    Collection<SpringBootExceptionReporter> exceptionReporters = new ArrayList<>();
9
10    // 3. 设置Headless模式
11    configureHeadlessProperty();
12
13    try {
14        // 4. 获取运行监听器并发布启动事件
15        SpringApplicationRunListeners listeners = getRunListeners(args);
16        listeners.starting();
17
18        try {
19            // 5. 准备环境
20            ApplicationArguments applicationArguments = new DefaultApplicationArguments(args);
21            ConfigurableEnvironment environment = prepareEnvironment(listeners, applicationArguments);
22
23            // 6. 打印Banner
24            Banner printedBanner = printBanner(environment);
25
26            // 7. 创建应用上下文
27            context = createApplicationContext();
28
29            // 8. 准备异常报告器
30            exceptionReporters = getSpringFactoriesInstances(SpringBootExceptionReporter.class,
31                    new Class[] { ConfigurableApplicationContext.class }, context);
32
33            // 9. 准备应用上下文
34            prepareContext(context, environment, listeners, applicationArguments, printedBanner);
35
36            // 10. 刷新上下文(核心阶段)
37            refreshContext(context);
38
39            // 11. 刷新后处理(空实现,子类可扩展)
40            afterRefresh(context, applicationArguments);
41
42            // 12. 停止计时器
43            stopWatch.stop();
44
45            // 13. 发布启动完成事件
46            if (this.logStartupInfo) {
47                new StartupInfoLogger(this.mainApplicationClass).logStarted(getApplicationLog(), stopWatch);
48            }
49            listeners.started(context);
50
51            // 14. 执行Runner回调
52            callRunners(context, applicationArguments);
53
54        } catch (Throwable ex) {
55            // 异常处理
56            handleRunFailure(context, ex, exceptionReporters, listeners);
57            throw new IllegalStateException(ex);
58        }
59
60        // 15. 发布应用就绪事件
61        listeners.ready(context);
62        return context;
63
64    } catch (Throwable ex) {
65        handleRunFailure(context, ex, exceptionReporters, null);
66        throw new IllegalStateException(ex);
67    }
68}
69
🎨 Banner 打印机制
Banner 打印实现细节:
1private Banner printBanner(ConfigurableEnvironment environment) {
2    // 1. 检查是否禁用Banner
3    if (this.bannerMode == Banner.Mode.OFF) {
4        return null;
5    }
6
7    // 2. 获取Banner资源
8    ResourceLoader resourceLoader = (this.resourceLoader != null) ? this.resourceLoader
9            : new DefaultResourceLoader(getClassLoader());
10
11    // 3. 使用BannerPrinter打印
12    SpringApplicationBannerPrinter bannerPrinter = new SpringApplicationBannerPrinter(resourceLoader, this.banner);
13
14    // 4. 根据模式选择输出流
15    if (this.bannerMode == Mode.LOG) {
16        return bannerPrinter.print(environment, this.mainApplicationClass, logger);
17    }
18    return bannerPrinter.print(environment, this.mainApplicationClass, System.out);
19}
20
自定义 Banner 实现示例:
1@Component
2public class CustomBanner implements Banner {
3
4    private static final String[] BANNER = {
5        "  ___  ___         _     _      ",
6        "  |  \\/  |        | |   | |     ",
7        "  | .  . | ___  __| |___| |__   ",
8        "  | |\\/| |/ _ \\/ _` / __| '_ \\ ",
9        "  | |  | |  __/ (_| \\__ \\ | | |",
10        "  \\_|  |_/\\___|\\__,_|___/_| |_|",
11        "                                "
12    };
13
14    @Override
15    public void printBanner(Environment environment, Class<?> sourceClass, PrintStream printStream) {
16        for (String line : BANNER) {
17            printStream.println(line);
18        }
19
20        String version = getVersion();
21        printStream.println(" :: Spring Boot :: " + version);
22        printStream.println();
23    }
24
25    private String getVersion() {
26        try {
27            return SpringBootVersion.getVersion();
28        } catch (Exception ex) {
29            return "v2.7.0";
30        }
31    }
32}
33
🌍 Environment 准备过程
prepareEnvironment() 方法详解:
1private ConfigurableEnvironment prepareEnvironment(SpringApplicationRunListeners listeners,
2        ApplicationArguments applicationArguments) {
3
4    // 1. 创建或获取Environment
5    ConfigurableEnvironment environment = getOrCreateEnvironment();
6
7    // 2. 配置Environment(处理命令行参数等)
8    configureEnvironment(environment, applicationArguments.getSourceArgs());
9
10    // 3. 发布Environment准备事件
11    listeners.environmentPrepared(environment);
12
13    // 4. 绑定Environment到SpringApplication
14    bindToSpringApplication(environment);
15
16    // 5. 检查是否自定义Environment
17    if (!this.isCustomEnvironment) {
18        environment = new EnvironmentConverter(getClassLoader()).convertEnvironmentIfNecessary(environment,
19                deduceEnvironmentClass());
20    }
21
22    // 6. 配置PropertySources
23    ConfigurationPropertySources.attach(environment);
24    return environment;
25}
26
Environment 创建逻辑:
1private ConfigurableEnvironment getOrCreateEnvironment() {
2    // 根据应用类型创建相应的Environment
3    if (this.environment != null) {
4        return this.environment;
5    }
6
7    switch (this.webApplicationType) {
8    case SERVLET:
9        return new StandardServletEnvironment();
10    case REACTIVE:
11        return new StandardReactiveWebEnvironment();
12    default:
13        return new StandardEnvironment();
14    }
15}
16
🔄 四、创建 ApplicationContext 与加载 BeanDefinition
🏗️ 应用上下文创建机制
createApplicationContext() 方法实现:
1protected ConfigurableApplicationContext createApplicationContext() {
2    // 1. 根据应用类型推断上下文类
3    Class<?> contextClass = this.applicationContextClass;
4    if (contextClass == null) {
5        try {
6            switch (this.webApplicationType) {
7            case SERVLET:
8                contextClass = Class.forName(DEFAULT_SERVLET_WEB_CONTEXT_CLASS);
9                break;
10            case REACTIVE:
11                contextClass = Class.forName(DEFAULT_REACTIVE_WEB_CONTEXT_CLASS);
12                break;
13            default:
14                contextClass = Class.forName(DEFAULT_CONTEXT_CLASS);
15            }
16        } catch (ClassNotFoundException ex) {
17            throw new IllegalStateException("Unable create a default ApplicationContext, " +
18                    "please specify an ApplicationContextClass", ex);
19        }
20    }
21
22    // 2. 使用反射创建实例
23    return (ConfigurableApplicationContext) BeanUtils.instantiateClass(contextClass);
24}
25
默认上下文类配置:
1// 默认上下文类常量
2public static final String DEFAULT_CONTEXT_CLASS = "org.springframework.context.annotation.AnnotationConfigApplicationContext";
3public static final String DEFAULT_SERVLET_WEB_CONTEXT_CLASS = "org.springframework.boot.web.servlet.context.AnnotationConfigServletWebApplicationContext";
4public static final String DEFAULT_REACTIVE_WEB_CONTEXT_CLASS = "org.springframework.boot.web.reactive.context.AnnotationConfigReactiveWebApplicationContext";
5
📋 上下文准备阶段
prepareContext() 方法深度解析:
1private void prepareContext(ConfigurableApplicationContext context, ConfigurableEnvironment environment,
2        SpringApplicationRunListeners listeners, ApplicationArguments applicationArguments, Banner printedBanner) {
3
4    // 1. 设置环境
5    context.setEnvironment(environment);
6
7    // 2. 后处理上下文(设置资源加载器、转换服务等)
8    postProcessApplicationContext(context);
9
10    // 3. 应用上下文初始器
11    applyInitializers(context);
12
13    // 4. 发布上下文准备事件
14    listeners.contextPrepared(context);
15
16    // 5. 打印启动信息
17    if (this.logStartupInfo) {
18        logStartupInfo(context.getParent() == null);
19        logStartupProfileInfo(context);
20    }
21
22    // 6. 注册特定的单例Bean
23    ConfigurableListableBeanFactory beanFactory = context.getBeanFactory();
24    beanFactory.registerSingleton("springApplicationArguments", applicationArguments);
25    if (printedBanner != null) {
26        beanFactory.registerSingleton("springBootBanner", printedBanner);
27    }
28
29    // 7. 设置允许Bean定义覆盖
30    if (this.allowBeanDefinitionOverriding != null) {
31        beanFactory.setAllowBeanDefinitionOverriding(this.allowBeanDefinitionOverriding);
32    }
33
34    // 8. 添加Bean后处理器(懒加载等)
35    if (this.lazyInitialization) {
36        context.addBeanFactoryPostProcessor(new LazyInitializationBeanFactoryPostProcessor());
37    }
38
39    // 9. 加载源(主配置类)
40    Set<Object> sources = getAllSources();
41    Assert.notEmpty(sources, "Sources must not be empty");
42    load(context, sources.toArray(new Object[0]));
43
44    // 10. 发布上下文加载事件
45    listeners.contextLoaded(context);
46}
47
🔧 上下文初始器应用
applyInitializers() 方法实现:
1protected void applyInitializers(ConfigurableApplicationContext context) {
2    // 1. 遍历所有ApplicationContextInitializer
3    for (ApplicationContextInitializer initializer : getInitializers()) {
4        Class<?> requiredType = GenericTypeResolver.resolveTypeArgument(initializer.getClass(),
5                ApplicationContextInitializer.class);
6
7        // 2. 检查类型匹配
8        if (requiredType != null && !requiredType.isInstance(context)) {
9            throw new IllegalStateException("Initializer " + initializer.getClass().getName() +
10                    " requires context of type " + requiredType.getName() + ", but got " + context.getClass().getName());
11        }
12
13        // 3. 应用初始器
14        initializer.initialize(context);
15    }
16}
17
典型的 ApplicationContextInitializer 示例:
1// Spring Boot 内置的初始器示例
2public class MyContextInitializer implements ApplicationContextInitializer<ConfigurableApplicationContext> {
3
4    @Override
5    public void initialize(ConfigurableApplicationContext applicationContext) {
6        // 1. 设置配置文件位置
7        ConfigurableEnvironment environment = applicationContext.getEnvironment();
8        environment.addActiveProfile("dev");
9
10        // 2. 添加自定义属性源
11        MapPropertySource customPropertySource = new MapPropertySource("custom",
12            Collections.singletonMap("app.custom.property", "value"));
13        environment.getPropertySources().addFirst(customPropertySource);
14
15        // 3. 注册自定义Bean
16        BeanDefinitionRegistry registry = (BeanDefinitionRegistry) applicationContext.getBeanFactory();
17        registry.registerBeanDefinition("customBean",
18            BeanDefinitionBuilder.genericBeanDefinition(CustomBean.class).getBeanDefinition());
19    }
20}
21
⚡ 五、refresh 阶段与自动装配结合点
🔄 refreshContext() 核心流程
刷新上下文的关键调用:
1private void refreshContext(ConfigurableApplicationContext context) {
2    // 1. 注册关闭钩子
3    if (this.registerShutdownHook) {
4        try {
5            context.registerShutdownHook();
6        } catch (AccessControlException ex) {
7            // 在安全管理器环境中可能不允许
8        }
9    }
10
11    // 2. 执行刷新(委托给AbstractApplicationContext)
12    refresh(context);
13}
14
15protected void refresh(ApplicationContext applicationContext) {
16    // 委托给ApplicationContext的refresh方法
17    if (applicationContext instanceof AbstractApplicationContext) {
18        ((AbstractApplicationContext) applicationContext).refresh();
19    }
20}
21
🎯 Spring Boot 特有的刷新扩展
SpringApplicationRefreshListener 的作用:
1// Spring Boot 对标准refresh的扩展
2@Component
3public class SpringBootRefreshListener implements ApplicationListener<ContextRefreshedEvent> {
4
5    private static final Logger logger = LoggerFactory.getLogger(SpringBootRefreshListener.class);
6
7    @Override
8    public void onApplicationEvent(ContextRefreshedEvent event) {
9        ApplicationContext context = event.getApplicationContext();
10
11        // 1. 记录刷新完成
12        logger.info("Application context refreshed: {}", context.getDisplayName());
13
14        // 2. 执行启动后检查
15        performPostRefreshChecks(context);
16
17        // 3. 发布自定义事件
18        context.publishEvent(new ApplicationRefreshedEvent(context));
19    }
20
21    private void performPostRefreshChecks(ApplicationContext context) {
22        // 检查关键Bean是否就绪
23        checkRequiredBeans(context);
24
25        // 验证配置属性
26        validateConfigurationProperties(context);
27    }
28}
29
🔧 自动装配与刷新的集成点
自动配置在刷新阶段的触发时机:
1// 在refresh()方法中的关键调用点
2@Override
3public void refresh() throws BeansException, IllegalStateException {
4    synchronized (this.startupShutdownMonitor) {
5        // ... 标准refresh流程
6
7        // 关键点:调用BeanFactory后处理器(包括自动配置)
8        invokeBeanFactoryPostProcessors(beanFactory);
9
10        // ... 其他步骤
11    }
12}
13
自动配置的触发流程:
ApplicationContext BeanFactoryPostProcessor AutoConfigurationImportSelector SpringFactoriesLoader invokeBeanFactoryPostProcessors() selectImports() loadFactoryNames() 加载spring.factories 返回自动配置类列表 返回需要导入的配置类 注册自动配置Bean定义 ApplicationContext BeanFactoryPostProcessor AutoConfigurationImportSelector SpringFactoriesLoader
📢 六、应用启动事件与回调机制
🎯 Spring Boot 启动事件体系
完整的启动事件序列:
1public class SpringBootEventSequence {
2
3    /**
4     * 完整的启动事件发布顺序
5     */
6    public void demonstrateEventSequence() {
7        // 1. ApplicationStartingEvent - 启动最开始
8        // 2. ApplicationEnvironmentPreparedEvent - 环境准备完成
9        // 3. ApplicationContextInitializedEvent - 上下文初始化
10        // 4. ApplicationPreparedEvent - 上下文准备完成
11        // 5. ContextRefreshedEvent - 上下文刷新完成(Spring标准事件)
12        // 6. ApplicationStartedEvent - 应用启动完成
13        // 7. ApplicationReadyEvent - 应用准备就绪(可以接收请求)
14        // 8. AvailabilityChangeEvent - 应用状态变更
15    }
16}
17
👂 事件监听器机制
SpringApplicationRunListeners 的实现:
1class SpringApplicationRunListeners {
2
3    private final Log log;
4    private final List<SpringApplicationRunListener> listeners;
5
6    // 启动事件发布方法
7    void starting() {
8        for (SpringApplicationRunListener listener : listeners) {
9            listener.starting();
10        }
11    }
12
13    void environmentPrepared(ConfigurableEnvironment environment) {
14        for (SpringApplicationRunListener listener : listeners) {
15            listener.environmentPrepared(environment);
16        }
17    }
18
19    void contextPrepared(ConfigurableApplicationContext context) {
20        for (SpringApplicationRunListener listener : listeners) {
21            listener.contextPrepared(context);
22        }
23    }
24
25    void contextLoaded(ConfigurableApplicationContext context) {
26        for (SpringApplicationRunListener listener : listeners) {
27            listener.contextLoaded(context);
28        }
29    }
30
31    void started(ConfigurableApplicationContext context) {
32        for (SpringApplicationRunListener listener : listeners) {
33            listener.started(context);
34        }
35    }
36
37    void ready(ConfigurableApplicationContext context) {
38        for (SpringApplicationRunListener listener : listeners) {
39            listener.ready(context);
40        }
41    }
42}
43
🔄 运行监听器获取机制
getRunListeners() 方法实现:
1private SpringApplicationRunListeners getRunListeners(String[] args) {
2    Class<?>[] parameterTypes = new Class<?>[] { SpringApplication.class, String[].class };
3
4    // 1. 从spring.factories加载SpringApplicationRunListener实现
5    List<SpringApplicationRunListener> listeners = getSpringFactoriesInstances(
6            SpringApplicationRunListener.class, parameterTypes, this, args);
7
8    // 2. 创建运行监听器包装器
9    return new SpringApplicationRunListeners(logger, listeners);
10}
11
典型的 SpringApplicationRunListener:
1public class EventPublishingRunListener implements SpringApplicationRunListener, Ordered {
2
3    private final SpringApplication application;
4    private final String[] args;
5    private final SimpleApplicationEventMulticaster initialMulticaster;
6
7    public EventPublishingRunListener(SpringApplication application, String[] args) {
8        this.application = application;
9        this.args = args;
10        this.initialMulticaster = new SimpleApplicationEventMulticaster();
11
12        // 注册应用监听器
13        for (ApplicationListener<?> listener : application.getListeners()) {
14            this.initialMulticaster.addApplicationListener(listener);
15        }
16    }
17
18    @Override
19    public void starting() {
20        // 发布ApplicationStartingEvent
21        this.initialMulticaster.multicastEvent(new ApplicationStartingEvent(this.application, this.args));
22    }
23
24    @Override
25    public void environmentPrepared(ConfigurableEnvironment environment) {
26        // 发布ApplicationEnvironmentPreparedEvent
27        this.initialMulticaster.multicastEvent(new ApplicationEnvironmentPreparedEvent(
28                this.application, this.args, environment));
29    }
30
31    // 其他事件发布方法...
32}
33
💻 七、自定义监听器与启动钩子实践
🛠️ 自定义启动监听器
完整的启动事件监听器示例:
1@Component
2@Slf4j
3public class ComprehensiveStartupListener implements
4    ApplicationListener<ApplicationEvent>, Ordered {
5
6    private long startupStartTime;
7    private Map<String, Long> phaseTimestamps = new LinkedHashMap<>();
8
9    @PostConstruct
10    public void init() {
11        this.startupStartTime = System.currentTimeMillis();
12        log.info("🚀 应用启动监听器已初始化");
13    }
14
15    @Override
16    public void onApplicationEvent(ApplicationEvent event) {
17        recordPhaseTimestamp(event.getClass().getSimpleName());
18
19        // 处理各种启动事件
20        if (event instanceof ApplicationStartingEvent) {
21            handleStartingEvent((ApplicationStartingEvent) event);
22        } else if (event instanceof ApplicationEnvironmentPreparedEvent) {
23            handleEnvironmentPreparedEvent((ApplicationEnvironmentPreparedEvent) event);
24        } else if (event instanceof ApplicationContextInitializedEvent) {
25            handleContextInitializedEvent((ApplicationContextInitializedEvent) event);
26        } else if (event instanceof ApplicationPreparedEvent) {
27            handlePreparedEvent((ApplicationPreparedEvent) event);
28        } else if (event instanceof ContextRefreshedEvent) {
29            handleContextRefreshedEvent((ContextRefreshedEvent) event);
30        } else if (event instanceof ApplicationStartedEvent) {
31            handleStartedEvent((ApplicationStartedEvent) event);
32        } else if (event instanceof ApplicationReadyEvent) {
33            handleReadyEvent((ApplicationReadyEvent) event);
34        }
35    }
36
37    private void handleStartingEvent(ApplicationStartingEvent event) {
38        log.info("📋 1. 应用启动开始");
39        logApplicationInfo(event.getSpringApplication());
40    }
41
42    private void handleEnvironmentPreparedEvent(ApplicationEnvironmentPreparedEvent event) {
43        log.info("🌍 2. 环境准备完成");
44        logEnvironmentInfo(event.getEnvironment());
45    }
46
47    private void handleContextInitializedEvent(ApplicationContextInitializedEvent event) {
48        log.info("🏗️ 3. 应用上下文初始化完成");
49    }
50
51    private void handlePreparedEvent(ApplicationPreparedEvent event) {
52        log.info("📦 4. 应用准备完成,Bean定义已加载");
53        logBeanDefinitionCount(event.getApplicationContext());
54    }
55
56    private void handleContextRefreshedEvent(ContextRefreshedEvent event) {
57        log.info("🔄 5. 应用上下文刷新完成");
58        logBeanStatistics(event.getApplicationContext());
59    }
60
61    private void handleStartedEvent(ApplicationStartedEvent event) {
62        log.info("✅ 6. 应用启动完成");
63    }
64
65    private void handleReadyEvent(ApplicationReadyEvent event) {
66        log.info("🎯 7. 应用准备就绪,可以处理请求");
67        generateStartupReport();
68    }
69
70    private void recordPhaseTimestamp(String phaseName) {
71        phaseTimestamps.put(phaseName, System.currentTimeMillis() - startupStartTime);
72    }
73
74    private void generateStartupReport() {
75        log.info("=== Spring Boot 启动性能报告 ===");
76        phaseTimestamps.forEach((phase, timestamp) -> {
77            log.info("   {}: {}ms", phase, timestamp);
78        });
79
80        long totalTime = System.currentTimeMillis() - startupStartTime;
81        log.info("   总启动时间: {}ms", totalTime);
82        log.info("=== 报告生成完成 ===");
83    }
84
85    @Override
86    public int getOrder() {
87        return Ordered.HIGHEST_PRECEDENCE; // 最高优先级,最先执行
88    }
89}
90
🔧 启动性能监控工具
启动时间分析工具类:
1@Component
2@Slf4j
3public class StartupPerformanceMonitor {
4
5    private final Map<String, BeanInitInfo> beanInitInfo = new ConcurrentHashMap<>();
6    private long contextRefreshStartTime;
7
8    @EventListener
9    public void onContextRefreshed(ContextRefreshedEvent event) {
10        this.contextRefreshStartTime = System.currentTimeMillis();
11        log.info("开始监控Bean初始化性能...");
12    }
13
14    @EventListener
15    public void onApplicationReady(ApplicationReadyEvent event) {
16        long totalTime = System.currentTimeMillis() - contextRefreshStartTime;
17        generatePerformanceReport(totalTime);
18    }
19
20    @Bean
21    public static BeanPostProcessor startupMonitorBeanPostProcessor() {
22        return new BeanPostProcessor() {
23            @Override
24            public Object postProcessBeforeInitialization(Object bean, String beanName) {
25                // 记录Bean初始化开始时间
26                BeanInitInfo info = new BeanInitInfo();
27                info.setStartTime(System.currentTimeMillis());
28                info.setBeanName(beanName);
29                info.setBeanType(bean.getClass().getName());
30                return bean;
31            }
32
33            @Override
34            public Object postProcessAfterInitialization(Object bean, String beanName) {
35                // 记录Bean初始化完成时间
36                BeanInitInfo info = getBeanInitInfo(beanName);
37                if (info != null) {
38                    info.setEndTime(System.currentTimeMillis());
39                    info.setDuration(info.getEndTime() - info.getStartTime());
40
41                    // 记录慢速Bean
42                    if (info.getDuration() > 100) { // 超过100ms
43                        log.warn("🐌 慢速Bean初始化: {} ({}ms)", beanName, info.getDuration());
44                    }
45                }
46                return bean;
47            }
48        };
49    }
50
51    private void generatePerformanceReport(long totalTime) {
52        log.info("=== Bean初始化性能报告 ===");
53
54        // 按初始化时间排序
55        beanInitInfo.values().stream()
56            .sorted(Comparator.comparingLong(BeanInitInfo::getDuration).reversed())
57            .limit(10) // 显示最慢的10个Bean
58            .forEach(info -> {
59                String speed = info.getDuration() > 100 ? "🐌" : "⚡";
60                log.info("   {} {}: {}ms", speed, info.getBeanName(), info.getDuration());
61            });
62
63        log.info("Bean初始化总时间: {}ms", totalTime);
64        log.info("监控的Bean数量: {}", beanInitInfo.size());
65    }
66
67    @Data
68    private static class BeanInitInfo {
69        private String beanName;
70        private String beanType;
71        private long startTime;
72        private long endTime;
73        private long duration;
74    }
75}
76
🎯 自定义应用运行器
CommandLineRunner 和 ApplicationRunner 示例:
1@Component
2@Slf4j
3public class StartupRunner implements CommandLineRunner, ApplicationRunner, Ordered {
4
5    private final ApplicationContext context;
6
7    public StartupRunner(ApplicationContext context) {
8        this.context = context;
9    }
10
11    @Override
12    public void run(ApplicationArguments args) throws Exception {
13        log.info("🔧 ApplicationRunner执行开始");
14        performApplicationStartupTasks();
15    }
16
17    @Override
18    public void run(String... args) throws Exception {
19        log.info("🔧 CommandLineRunner执行开始");
20        performCommandLineTasks(args);
21    }
22
23    private void performApplicationStartupTasks() {
24        // 1. 检查关键Bean是否就绪
25        checkCriticalBeans();
26
27        // 2. 验证配置属性
28        validateConfiguration();
29
30        // 3. 初始化应用数据
31        initializeApplicationData();
32
33        log.info("✅ 应用启动任务完成");
34    }
35
36    private void performCommandLineTasks(String[] args) {
37        if (args.length > 0) {
38            log.info("命令行参数: {}", Arrays.toString(args));
39
40            // 处理特定的命令行参数
41            if (Arrays.asList(args).contains("--init-db")) {
42                initializeDatabase();
43            }
44        }
45    }
46
47    private void checkCriticalBeans() {
48        String[] criticalBeans = {
49            "dataSource", "entityManagerFactory", "transactionManager"
50        };
51
52        for (String beanName : criticalBeans) {
53            if (context.containsBean(beanName)) {
54                log.info("✅ 关键Bean已就绪: {}", beanName);
55            } else {
56                log.warn("⚠️ 缺少关键Bean: {}", beanName);
57            }
58        }
59    }
60
61    @Override
62    public int getOrder() {
63        return 1; // 执行顺序
64    }
65}
66
🔧 启动故障诊断工具
启动问题诊断器:
1@Component
2@ConditionalOnProperty(name = "app.startup.diagnostic", havingValue = "true")
3@Slf4j
4public class StartupDiagnosticTool {
5
6    @Autowired
7    private ApplicationContext context;
8
9    @EventListener
10    public void diagnoseOnReady(ApplicationReadyEvent event) {
11        log.info("=== 启动故障诊断开始 ===");
12
13        // 1. 检查Bean定义冲突
14        checkBeanDefinitionConflicts();
15
16        // 2. 检查循环依赖
17        checkCircularDependencies();
18
19        // 3. 检查配置属性
20        checkConfigurationProperties();
21
22        // 4. 检查数据库连接
23        checkDatabaseConnection();
24
25        log.info("=== 启动故障诊断完成 ===");
26    }
27
28    private void checkBeanDefinitionConflicts() {
29        try {
30            if (context instanceof ConfigurableApplicationContext) {
31                ConfigurableListableBeanFactory beanFactory =
32                    ((ConfigurableApplicationContext) context).getBeanFactory();
33
34                // 检查重复的Bean定义
35                String[] beanNames = beanFactory.getBeanDefinitionNames();
36                Map<String, List<String>> typeToBeanNames = new HashMap<>();
37
38                for (String beanName : beanNames) {
39                    BeanDefinition bd = beanFactory.getBeanDefinition(beanName);
40                    String className = bd.getBeanClassName();
41                    if (className != null) {
42                        typeToBeanNames.computeIfAbsent(className, k -> new ArrayList<>())
43                                      .add(beanName);
44                    }
45                }
46
47                // 报告冲突
48                typeToBeanNames.entrySet().stream()
49                    .filter(entry -> entry.getValue().size() > 1)
50                    .forEach(entry -> log.warn("🔴 Bean定义冲突: {} -> {}",
51                        entry.getKey(), entry.getValue()));
52            }
53        } catch (Exception e) {
54            log.warn("Bean定义冲突检查失败: {}", e.getMessage());
55        }
56    }
57
58    // 其他检查方法...
59}
60
💎 八、总结:从 main() 到容器就绪的生命线
🎯 Spring Boot 启动流程核心总结
启动阶段关键节点回顾:
| 阶段 | 关键方法 | 主要工作 | 发布事件 |
|---|---|---|---|
| 初始化阶段 | SpringApplication 构造函数 | 推断 Web 应用类型(Servlet、Reactive)、加载 ApplicationContextInitializer 与 ApplicationListener | — |
| 环境准备阶段 | prepareEnvironment() | 构建 ConfigurableEnvironment,加载配置文件与系统属性,合并命令行参数 | ApplicationEnvironmentPreparedEvent |
| 创建上下文阶段 | createApplicationContext() | 实例化具体类型的 ApplicationContext(如 AnnotationConfigServletWebServerApplicationContext) | ApplicationContextInitializedEvent |
| 上下文准备阶段 | prepareContext() | 应用 ApplicationContextInitializer,注册核心单例 Bean(如 springApplicationArguments) | ApplicationPreparedEvent |
| 上下文刷新阶段 | refreshContext() | 加载 Bean 定义、创建单例 Bean、初始化容器生命周期 | ContextRefreshedEvent |
| 启动完成阶段 | afterRefresh() | 执行 ApplicationRunner 与 CommandLineRunner,发布应用就绪事件 | ApplicationReadyEvent |
🔄 启动流程完整时序图
Spring Boot 应用启动完整流程:
User main() SpringApplication EventListener ApplicationContext BeanFactory Runner 执行java -jar SpringApplication.run() 阶段1: 初始化 推断应用类型 加载Initializer/Listener ApplicationStartingEvent 阶段2: 环境准备 创建Environment 处理配置属性 ApplicationEnvironmentPreparedEvent 阶段3: 上下文创建 创建ApplicationContext 应用Initializer ApplicationContextInitializedEvent 阶段4: 上下文准备 准备上下文 注册单例Bean ApplicationPreparedEvent 阶段5: 刷新上下文 refresh() 加载Bean定义 实例化单例 ContextRefreshedEvent 阶段6: 启动完成 执行Runner ApplicationStartedEvent ApplicationReadyEvent 返回ApplicationContext 应用启动成功 User main() SpringApplication EventListener ApplicationContext BeanFactory Runner
🚀 性能优化建议
启动性能优化策略:
1@SpringBootApplication
2public class OptimizedApplication {
3
4    public static void main(String[] args) {
5        SpringApplication app = new SpringApplication(OptimizedApplication.class);
6
7        // 1. 配置优化选项
8        app.setLazyInitialization(true); // 启用懒加载
9        app.setBannerMode(Banner.Mode.CONSOLE); // 控制Banner输出
10
11        // 2. 排除不必要的自动配置
12        app.setDefaultProperties(Collections.singletonMap(
13            "spring.autoconfigure.exclude",
14            "org.springframework.boot.autoconfigure.jdbc.DataSourceAutoConfiguration"
15        ));
16
17        app.run(args);
18    }
19
20    @Configuration
21    @ConditionalOnProperty(name = "app.optimization.enabled", havingValue = "true")
22    public static class OptimizationConfig {
23
24        @Bean
25        public StartupOptimizer startupOptimizer() {
26            return new StartupOptimizer();
27        }
28    }
29}
30
🔧 调试与监控最佳实践
生产环境启动监控配置:
1# application-prod.properties
2# 启动性能监控
3management.endpoints.web.exposure.include=health,info,metrics,startup
4management.endpoint.startup.enabled=true
5
6# 详细的启动日志
7logging.level.org.springframework.boot=INFO
8logging.level.com.example=DEBUG
9
10# 启动超时设置
11spring.boot.startup.timeout=300s
12
13# 懒加载配置
14spring.main.lazy-initialization=true
15
16# 排除不必要的自动配置
17spring.autoconfigure.exclude=org.springframework.boot.autoconfigure.jdbc.DataSourceAutoConfiguration
18
《Spring Boot 启动流程源码解析》 是转载文章,点击查看原文。

